
Scroll down for lots of ideas for making your own contemporary Christmas wreath if you already know how. If you haven’t made a wreath before, firstly it is much easier than you might think. Secondly, I’ve shared the wreath making workshop I did with the very lovely Sarah Diligent which is where I learned to make mine. Hope you enjoy! x
When Sarah invited me to join one of her workshops to learn how to make a contemporary Christmas wreath, I didn’t hesitate because I love her approach to flowers. She uses British-grown and foraged flowers and foliage as much as possible and has an effortless and natural design style.
How to make a contemporary Christmas wreath – The Workshop
Sarah’s workshop is in the rural Hampshire village of Eversley. I was feeling slightly frazzled when I arrived at her door on a bitterly cold frosty December morning. I’d spent much of the drive over crawling behind a wide range of slow-going agricultural vehicles. Along miles of winding country lanes with few places to overtake. Trying not to watch the time ticking by and then finally bursting in with the google maps directions still blaring from my coat pocket.


The other side of the workshop door was a warm and welcoming space full of the fragrance of cinnamon, mulled wine and flickering scented candles. I unloaded my camera and notebook which meant I finally had a hand free to turn my phone off. Sarah welcomed me with a really good cup of tea and a mince pie. I was soon feeling calmer and ready to get creative with foliage.


Sarah started the workshop by showing us how to create the basic wreath. She’d actually already made us one each, so we could, as she put it ‘concentrate on the exciting creative bit.’ But she wanted us to know how she’d done it.

To make the basic wreath
You start off with a metal wreath frame in the size you choose. You can pick these up cheaply at craft shops and florists. I reuse mine multiple times by taking the foliage off in January and keeping in the shed ready for the next time. Don’t worry if they start to look rusty and unappealing – as long as there’s still plenty of strength left (ie it hasn’t rusted away) you should be fine as you won’t be seeing it anyway.
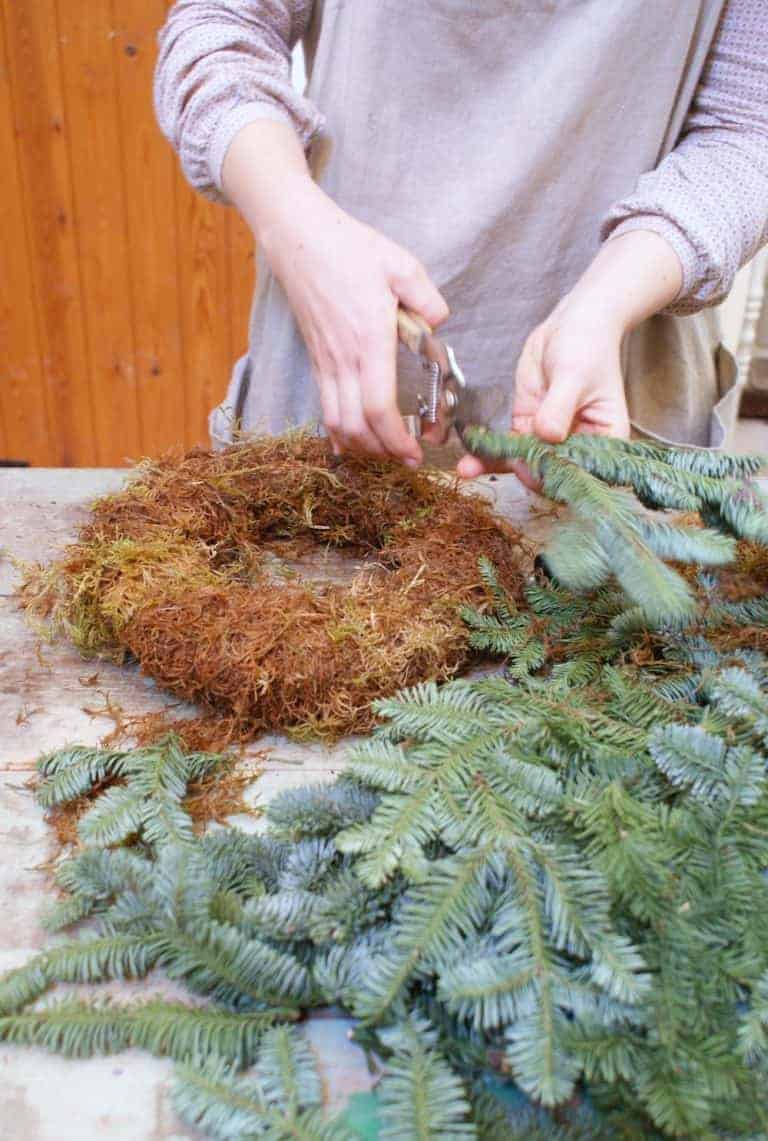
Next step is to incorporate generous handfuls of damp moss and holding in place by winding floristry wire around as you go. The key is to keep the depth and shape as even as you can. I have a lawn full of moss which comes in very handy at this time of year.

Add the greenery
After the moss has been added, it’s time to add the basic greenery. You can use off cuts from your Christmas tree or snip evergreen branches from the garden (which is what I do.) Christmas tree suppliers are usually happy to offer free off-cuts too.

The trick with this bit is to create a sharp point by cutting the ends on a diagonal. This should make it easier to push the ends through the moss and into position.
Start in one place and then work your way around, going in one direction and adding pieces as you go until you’re happy with the basic shape.

Decorating the wreath
This was the part I was really looking forward to. I’d spied some beautiful pink peppercorns in a jug and really wanted to add some. I was also drawn to fragrant juniper and lavender foliage and the box of dried hops. The ingredients in Sarah’s studio were perfect to make a contemporary Christmas wreath.


The technique for adding in the decorations is the same as adding the basic foliage. If possible, you cut a diagonal end, poke through in position and ensure the end isn’t coming out the other side.

If, like the pink peppercorns, the ends are too fine or delicate to poke through this way, you attach by using a length of florist’s wire. The technique is to cut a short length of wire, then bend it over like a hair pin before positioning it over the stalk of the piece you’re wanting to attach and poke through. Any ends that come right through can be bent over.
As you work, it’s important to keep an eye on the overall shape and balance – and to work out where the top will be.


Frosted fruit
My wreath was starting to take shape. All it needed now was some frosted fruit. I’d spotted the glass jars full of sparkling golden pears and rosy apples – but wrongly assumed they were fake. It turns out they were real fruit that had been dipped in wax and sprinkled with sparkle. Which made me love them even more.


Time to embellish
I decided to go for the rosy apples because I liked the way they looked with the pink peppercorns.
The knack to adding the fruit is to take two lengths of floristry wire and poke each through the base of the apple and then fold back and around to create one length of wire with an apple secured at one end. This gets poked through in the same way as the foliage and other decorations.
There was a box of beautiful ribbons to choose from but I decided to keep mine simple and decided not to add a bow. It felt more in keeping somehow as I had set out to make a contemporary Christmas wreath.
To create the wire hanger, you take two pieces of strong florist’s wire and create a loop which gets poked in and back around at the point that you’ve chosen as your top.


Another year another wreath…
I make a wreath every year, so I thought I’d share these other wreaths I’ve made over the years with you too in case they spark ideas.
This wreath was made at another wonderful day at a workshop – this time with The Sussex Flower School.
I went for a wilder look this time, using lots of evergreen foliage, pheasant feathers, seed heads and ivy. Read more details on how to make a contemporary Christmas wreath like this one here: Christmas Wreath DIY ideas & tutorial

Make a contemporary Christmas wreath – foraged with hand-torn white linen ribbon

This was last year’s wreath and I think it might be my favourite ever. It was made using foraged ingredients from my garden and homemade white torn ribbon. Read more on how I made it here: How to make a simply beautiful foraged wreath
Make a contemporary Christmas wreath – Amber glass and velvet ribbon

This idea began with the beautiful amber glass baubles and velvet ribbon. I kept the base of this wreath very simple and evergreen using ingredients snipped from the garden. When I first made it I felt it needed a few lime white hellebore flowers to lift it. But I haven’t got round to doing this and now I’m not sure it isn’t better as is and have had lots of compliments about it.
Make a contemporary Christmas wreath – Fresh and dried

What I loved about this wreath was the novel combination of fresh and dried ingredients. All finished with a lavish velvet bow. Read more info on how I made it here: Make a beautiful fresh and dried Christmas wreath
Make a contemporary Christmas wreath – more ideas to inspire
The basic technique is that same as above, but you can change things up depending on the foliage you go for. Here are some creative contemporary Christmas wreath ideas I love…

This beautiful dried flower wreath in Winter whites is by Kirsten Mackay of Henthorn Farm Flowers. Using a handmade wisteria wreath ring, dried anaphalis, helicrysum and honesty are combined to create a contemporary, ethereal look.
Kirsten has kindly shared her step by steps to creating this wreath to help you make one just like it:
Kirsten’s tips
I used a base of wisteria vine, woven into a wreath and then left to dry and harden. You can use any type of vine to make your own – be that ivy, grape, clematis or even long lengths of willow. But the key is to form it into shape while the wood is still fresh and flexible.
I wrap twine or wire around the frame to give me more anchor points and then I carefully thread my stems through the open structure.
This creatures a loose, airy and delicate wreath where the plant material appears to float.
The honesty needs to be carefully peeled on both sides to reveal the moon like disc and cut to size.
I use other dried white flowers to lighten the look and add interest. Dried gypsophila works well as do the tiny flowers of Anaphlasis triplinervis which is a perennial plant I grow especially for drying.
To finish, weave through some dried white helichrysum and add a wire hook to the back.

Based in beautiful Clitheroe in Lancashire, Henthorn Farm Flowers grow seasonal and sustainable cut blooms for weddings, events, workshops and farm gate sales.
I absolutely love their organic ethos and natural style, and will be featuring Kirsten over on the blog shortly – so watch this space!
This dried flower wreath is available to order for £70. To order one, contact Kirsten via Instagram here
Make a contemporary Christmas wreath – peacock feathers by Philippa Craddock


Love this combination of eucalyptus, fir and peacock feathers by Philippa Craddock.
Olga Prinku

This wonderfully creative idea is by the very wonderful Olga Prinku. It’s made by adding lots of little dried flower tulle embroidery hoops. Olga has shared her step by steps to embroidering with dried flowers on tulle over on the blog: How to make embroidery hoop art with dried flowers. To make a ‘Christmas tree’ with your hoops, simply make 15 of them and group together in rows as shown and top with a simple star.
Make a contemporary Christmas wreath – Worm London

I love this unusual dried flower wreath by East London florists Worm, c0-founded by Katie Smyth and Terri Chandler (they offer various workshops including a Christmas Wreath making one.


For more wonderful wreath-making ideas, Terri and Katie have written the most beautiful book on the subject, Wreaths, which you can order on Amazon here
Here’s a peek at a few of the ideas you’ll find inside and on their Instagram gallery.


Simply by Arrangement
How gorgeous is this giant wreath (below) made by Sarah of Simply by Arrangement and photographed by Sarah Mason (www.sarahmasonphoto.co.uk)?

Sarah made a base using copper pipe that she built up with lots of moss and textural foliage – dried thyme, mimosa, eucalyptus, berries, lichen-covered twigs and a few pheasant feathers.


This idea is by Treasures & Travels – to get the simple steps to making a giant wreath click here:

Pod & Pip
The lovely Sarah at Pod & Pip (listed in our directory here) also offers creative wreath-making workshops as well as fresh wreaths available to buy. Love these two made by her – both using deep red colours and pheasant feathers.


Catkin Flowers
Also really like this combination of pine cones, pheasant feathers, ivy and seed heads by Rachel Petheram of Catkin Flowers (listed in our directory here)

Also by Rachel is this stunning combination of dried and fresh materials. Dried ferns and hydrangea contrast beautifully with fresh greenery, Chinese lanterns and pink peppercorns.

Leigh Chappell
How beautiful is this fresh foliage with dried flowers wreath by Leigh Chappell flowers?

I love the combination of dark, glossy foliage, dried stems and leaves and the pops of pretty colour from dried helichrysum (or straw flowers). The beautiful pink velvet ribbon makes the perfect finishing touch, don’t you think? It’s from The Natural Dye Works – well worth checking out for some of the loveliest ribbons around.
You can buy wired dried straw flowers from Etsy here.
The Real Flower Company is always a great source of ideas. Love this wreath they made for the Chelsea Cabbages & Roses shop

The Real Flower Company
And how gorgeous is this simple rustic wreath using a willow hoop, olive leaves, eucalyptus and some simple blooms, from one of The Real Flower Company’s wreath making workshops?


For a contemporary take on traditional dried orange wreaths, what about this beauty also by RFC? It’s available to buy here

Love the combination of eucalyptus, fir, ivy, bay, pink peppercorns and dried citrus fruits. It’s the wild, abundant look and how the colours work together, that makes it, don’t you think?
Kate Langdale
And how beautiful are these creations by wonderful Brighton florist Kate Langdale? To make a large wreath like this, you will need
5-10 long willow or other pliable green woody stems that have been soaking in water until pliable. Best way to do this is in a deep sink or large bucket (you will need to gradually bend the stems as the stems below the water line become more pliable until the stems are fully submerged). Once you’re happy that your stems have become pliable, wrap them up in a damp towel to mellow.
To make your wreath, take hold of one length, with the thick end in your left hand (if you’re right handed|) and then and form a loop as though you are tying a knot to create a loop at the size you’d like your wreath to be. Hold the ‘knot’ in one hand and wrap the two ends around by going under and over as you go. Then take the next stems, poking them through the hoop, holding the thick end in your left hand and wind around going over and under.
Continue until you have added all the stems, working in the same direction. You can mould by gently pushing into the circular shape you’d like. Cut off any ends that won’t bend into the wring and you’re done. Then it’s time to add your embellishments. To create a wreath like this one by Kate, add grasses, hydrangea, evergreen branches and dried ferns in two sections the bottom of the wreath, attaching with strong florist wire as you go.


INFORMATION
This article contains affiliate links, which means we may earn a small commission if a reader clicks through and makes a purchase. All our blog posts are independent and in no way influenced by any advertiser or commercial initiative. By clicking on an affiliate link, you accept that third-party cookies will be set.
You might also like:
How to make Christmas crackers with pretty paper
Handmade Christmas Decorations
Floribunda Rose is listed in the From Britain with Love directory
Olga Prinku is listed in the From Britain with Love directory
Catkin Flowers is listed in the From Britain with Love directory here >>
Philippa Craddock is listed in the From Britain with Love directory here >>
Pod & Pip is listed in the From Britain with Love directory here >>
Feeling inspired? Take a look at the Creative Workshops category in our Directory, where you’ll find a variety of inspiring courses, from art and crafts to fashion and beauty, interiors, cooking and flower & gardening.
If you run a creative course that would interest our readers, please get in touch. Email us at editor@frombritainwithlove.com


Hello! Thank you for posting this wonderful, helpful guide to wreath-making. I just have a question – how long do the wreaths survive? If I make mine today, could it be alive and well on Christmas Day? If there are some techniques to assure the livelihood of a natural wreath, could you please share? Thank you!
I’m so glad! So, I made mine around the end of November and it looked perfect all over Christmas and was still going strong when it was time to take it down in January. The frosted apples needed to be removed but the rest of it would have lasted for weeks and weeks more. Sarah told us to keep it cool and not be tempted to store indoors before hanging. The other tip Sarah shared was to ideally hang somewhere that is slightly sheltered from rain. Mine was only slightly sheltered by overhanging porch rafters, but I think it did help. Hope that’s useful and hope you enjoy making yours!
Thank you, that was really helpful 🙂 I’m so glad I stumbled across your blog, I think I’ll visit more often 🙂 all the best!
You’re very welcome – hope you find more ideas to enjoy 😊
Lovely! Thanks for sharing. Also wanted to comment on the antique clippers seen under the basic wreath heading and shown with the red twine. They also are featured in some other blog posts. I have inherited my mother’s as well as her mother’s. I can remember them both being used to cut various flowers in their gardens as well as make many floral crafts and arrangements. I now use and cherish them.
Those clippers sound like very precious possessions! I would love to be able to follow in my mother’s footsteps and cut flowers with her old clippers 😊
Wow wow wow toll!!!!!!!!!!!!
Everything looks lovely on this blog!👏👍
Warmest Christmas wishes to all!😁🎄🕊