
Learn how to make silver clay jewellery
Scroll down the page for lots of inspiration from artist and writer Emma Mitchell who creates beautiful silver clay jewellery using foraged natural finds. You’ll find all the links you need to connect with Emma (she has written a beautiful collection of best-selling books and also offers inspiring creative workshops – get all the info further down the page below the DIY step by step to making silver clay jewellery at home).

photo credit: Emma Mitchell
To get DIY step by steps to simple silver clay jewellery making at home, read on. For this month’s Course Notes feature, Nicky Sherwood visits the Sussex studio of Paula Paton and learns how to make silver clay jewellery using the versatile and relatively new material – silver clay.
Key things to know about silver clay jewellery before we start
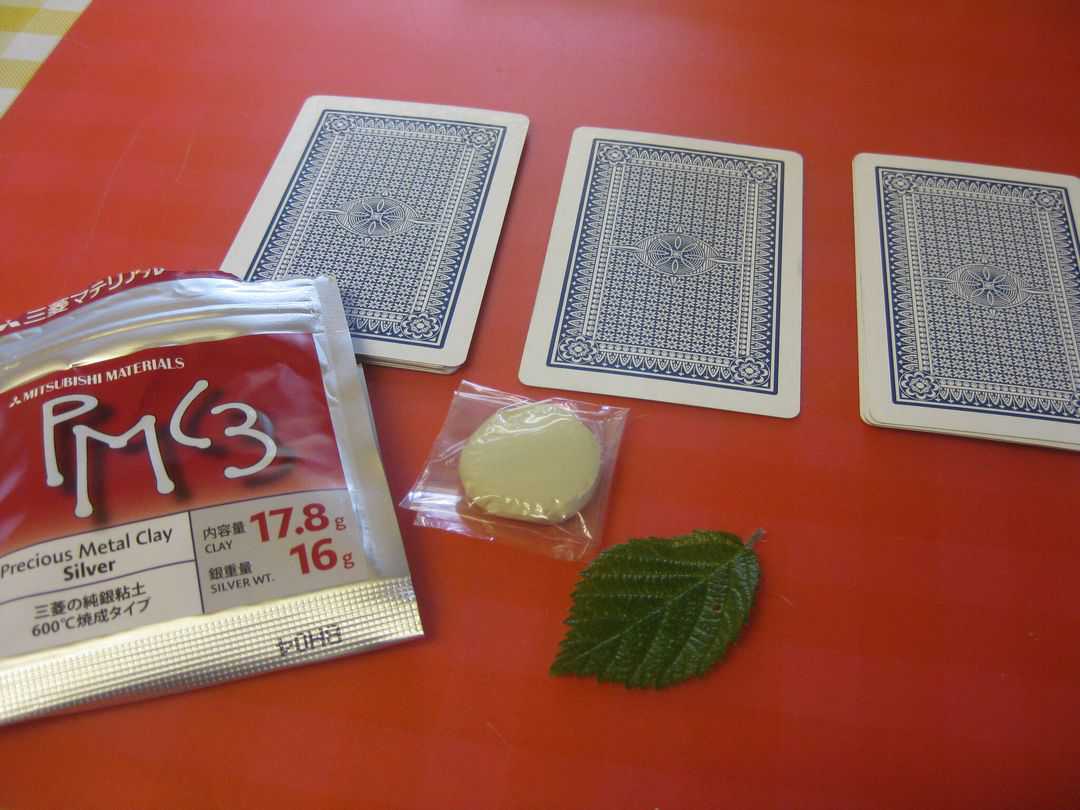
Precious Metal Clay contains tiny silver particles, a non-toxic binder and water that transforms into 99.9% pure silver when fired in a kiln or with a blowtorch.</p>
• Silver clay can be worked using moulds, texture mats, fresh botanical specimens, and standard clay tools before being dried and fired at specific temperatures to achieve the final silver form.</p></p>
• The firing process requires achieving a salmon colour for two minutes when using a blowtorch, or approximately 10 minutes in a professional kiln, after which the white surface must be brushed away to reveal the shiny silver b
eneath.</p>
• Creating detailed silver jewellery from silver clay requires only 16g of material (approximately £21) and produces results with finer detail than traditional metalworking methods can achieve.</p>
• Silver clay pieces can be hallmarked as pure silver once fired, making them suitable for professional jewellery creation or personal gift-making.</p>
The “Silver Fossil” Technique: Preserving Ephemeral Nature in Permanent Form
One of the most compelling aspects of silver clay that deserves deeper exploration is its unique ability to capture nature’s most delicate, temporary details before they fade. Unlike traditional silversmithing, which requires hard-wearing moulds and industrial techniques, silver clay allows you to immortalise the actual botanical specimen itself.
Creating Your Own Nature Library:
Spring specimens: Cherry blossom petals, cow parsley umbels, delicate fern fronds
Summer finds: Herb leaves (particularly sage with its textured surface), flower stamens, grass seed heads
Autumn treasures: Oak leaf skeletons, acorn caps, dried seedpods
Winter offerings: Bare twig sections, pine needles, dried berries
The Preservation Sweet Spot:
Fresh specimens work best when they’re slightly dried (12-24 hours after picking) – still flexible enough to press without cracking, but firm enough to hold detail. Store specimens between pages of a heavy book with baking parchment to achieve this perfect state.
Pro technique: Create a seasonal collection throughout the year, then design a charm bracelet or necklace that tells the story of your local landscape across all four seasons. Each charm becomes a tiny time capsule of a specific moment in nature.
The DIY step by steps
I first came across silver clay a couple of years ago when I was given a gift bearing the imprint of my then baby son’s fingerprint. I was amazed by the fine detail and had always wondered how the technique was done, so when I came across Paula Paton’s Learn Silver clay workshops, I was keen to have a go myself and see what could be achieved as a complete beginner.
Paula teaches her workshops from a delightful purpose-built studio in her garden and keeps the groups small so she can give each student individual attention, as well as their own workstation. In our group of three I was intrigued to hear that one of the other students was in fact a professional jeweller who had heard about what could be achieved using silver clay and was interested to see how the results compared with using sheet silver.
How to make silver clay jewellery
Materials you’ll need
Silver clay
You can buy the PMC3 clay on Amazon, Etsy and elsewhere.
Leaves/seed heads, natural findings
Silicone moulds -Etsy has a good selection.
Or, best of all, why not make your own silicon casts? Mould your foraged finds and create jewellery from seed heads, acorns, flowers, herbs…
Pebeo Silicon Fast Set is available to buy on Amazon and works a treat.
Textures and tools
Silver Clay Type Comparison: Choosing the Right Formula
| Clay Type | Firing Method | Best For |
| PMC3 | Blowtorch or kiln | Beginners, home use |
| Art Clay Silver | Lower temperature firing | Delicate details, mixed media |
| Prometheus 950 | Higher temperature required | Stronger pieces, hallmarking |
| Clay Paste | Same as base clay | Repairs, attachments, detail work |

Precious Metal Clay (or silver clay)
Silver Clay Shrinkage & Planning Guide
| Original Size | After Firing | Shrinkage Rate |
| 20mm charm | 18mm charm | 8-12% |
| 40mm pendant | 36mm pendant | 8-12% |
| Ring size N | Ring size L | 2 sizes down |
| 3mm hole | 2.7mm hole | Plan accordingly |
After an introduction to the tools and materials that we would be using, Paula showed us examples of what could be achieved using silver clay, and gave a demonstration of how the clay is used. A relatively new material, Precious Metal Clay (PMC) or silver clay as it’s also known, was originally developed in Japan. It contains tiny silver particles, a non-toxic binder and water. In this form it resembles clay and can easily be shaped and formed. Once dried, it’s then fired in a kiln or using a blowtorch which causes the binder to burn off, leaving behind pure (99.9%) silver, which can even be hallmarked as such.
Bubblegum into silver..?
Due to its purity silver clay doesn’t come cheap, and the small 16g pack that we were each given to work with costs around £21 to buy. I found it hard to imagine that this small grey blob resembling a piece of chewing gum would soon be transformed, as if by alchemy, into pure silver.

Rose leaf print
Our first project was to create a pendant using texture, moulds and construction techniques. Paula showed us how to roll out a small piece of clay to the required thickness, which involved starting with a stack of seven playing cards (lightly greased with Badger Balm) on either side, then gradually reducing them down to five cards. I had decided to create a leaf motif and Paula showed me how to press a fresh rose leaf from the garden into the clay to imprint the texture into it.

dragonfly mould
Next I chose a tiny silicone mould of a dragonfly from the extensive selection available, and pressed a small amount of clay into the mould, before turning it out and attaching it to the leaf shape using liquid clay.

I rolled out a small snake of clay to create a ‘bail’ to hang the pendant from and attached it to the top of the leaf. The pendant was then placed in a dehydrator (a sort of electric steamer in reverse) to dry it out quickly. Once dry, Paula suggested I use a small hand file to cut into the edges to create a more natural-looking, uneven edge around the leaf.

Using a textured mat
While our pendants were drying, it was time to try out another project using a different technique – this time adding pattern to the clay using a textured mat.

For my second piece, I’d decided on a heart shape so I chose a mat with a script pattern based on a Victorian love letter. Pressing the rolled out clay onto the mat successfully imprinted the detailed pattern, and I then used a metal pastry cutter to create my heart shape, before placing the piece in the dehydrator to dry out.


Texture Depth vs Clay Thickness Requirements
| Texture Type | Minimum Thickness | Playing Cards |
| Fine script/lace | 0.5mm | 3 cards |
| Fabric/canvas | 1mm | 5 cards |
| Deep pattern/bark | 1.5mm | 7 cards |
| Fresh botanicals | 1mm | 5 cards |
Arum lily

My third project of the day involved constructing a tiny three-dimensional Arum lily, again using a metal cutter to create the basic shape, which was then folded and pinched to resemble the flower petal. A tiny stamen was then piped into the inside using a syringe filled with clay.
Silver clay seashells

For my final project, by which time I had only a small amount of clay left, I decided to create a collection of small silver charms using silicone moulds featuring seashell and fossil motifs. Soon my clay was all gone and I had the grand total of eight separate pieces of soon-to-be silver jewellery languishing in the dehydrator.

After drying, the clay pieces were placed on a mirror to ensure there was no moisture left, then declared ready for firing. Paula showed us a technique for firing the clay which can be done at home using a hand-held blowtorch, telling us that the clay would be ready 2 minutes after it achieved a salmon colour (poached not smoked!). But for speed’s sake, and because we had quite a lot between us, our pieces were placed in her professional kiln and fired for 10 minutes.

The silver clay transformation
For some reason, I had expected the dry white pieces to come out of the kiln miraculously transformed into shining silver, and was a little surprised when they emerged looking pretty much the same as when they went in. It turns out that a little more intervention is needed and Paula gave us each a stiff wire brush which we quickly got to work with.

This is when the magic starts to happen – as the white dust gently falls away, the shiny silver beneath the surface begins to appear. Gradually I realised that what appeared to be brittle grey clay had in fact been transformed into very robust fine silver.

Having seen the transformation with my leaf pendant I quickly moved onto my heart tag, brushing away the matt white coating to reveal the fine detail of the script imprinted into the silver.


Finishing Techniques & Their Effects
| Tool | Finish Result | Time Required |
| Stiff wire brush | Satin/brushed finish | 2-3 minutes |
| Soft brass brush | Medium shine | 5 minutes |
| Polishing papers | High shine | 10 minutes |
| Agate burnisher | Mirror finish | 15-20 minutes |
| Liver of sulphur | Antique/oxidised | 5 minutes + polish |
The finished result
Last of all, I carefully buffed and polished each of my tiny silver charms until they came up glowing, while Paula showed me how to attach rings to them using solder and a blowtorch. She suggested I attach them to a length of chain to form a pendant, then we chose some seed pearl beads and strung the finished pendant onto an aqua leather thong to complete the ‘coastal’ look.

As the sun started to set outside over Paula’s garden and the day drew to a close, I marvelled at how much we had achieved – both in terms of time, skills and techniques, but also from that small and rather uninspiring blob of greyish clay which we’d each started off with. The finished results are incredibly detailed – every vein was visible on my finished leaf pendant, and even the jeweller on the course commented on how this level of detail would be very hard to achieve using traditional methods.
All in all, this fascinating and fun one day workshop in the heart of the Sussex countryside is an excellent starting point for anyone wanting to create professional looking silver jewellery for themselves, for friends and family, or even as a business.
Project Time & Material Cost Breakdown
| Project Type | Clay Needed | Total Time |
| Simple pendant | 8-10g (£11-13) | 45-60 minutes |
| Stud earrings (pair) | 4-6g (£5-8) | 30-40 minutes |
| Charm collection (5) | 12-15g (£16-20) | 90 minutes |
| Statement ring | 10-12g (£13-16) | 60-75 minutes |
| 3D sculptural piece | 15-20g (£20-26) | 2-3 hours |
Important key points to remember
#1 Silver clay transforms from pliable material to 99.9% pure silver through firing in a kiln or with a blowtorch, creating hallmark-quality pieces without traditional metalworking skills or equipment.
#2 Botanical specimens and natural textures create detail impossible with traditional silversmithing because the clay captures every microscopic vein, ridge, and surface characteristic before firing permanently sets these impressions in silver.
#3 Material costs require strategic planning at £21 per 16g but reconstituting dried scraps with distilled water, using paste for detail work, and calculating project sizes in advance eliminates waste and maximises value.
#4 The firing process demands precise timing and temperature control with pieces needing to maintain a salmon-pink colour for exactly two minutes at 760-800°C to ensure silver particles properly fuse without losing fine detail.
#5 Post-firing finishing techniques determine the final aesthetic ranging from brushed satin finishes achieved in minutes to mirror-polished surfaces requiring 15-20 minutes of burnishing, with oxidisation offering antique effects for dimensional pieces.
More Ideas & Inspiration
Emma Mitchell
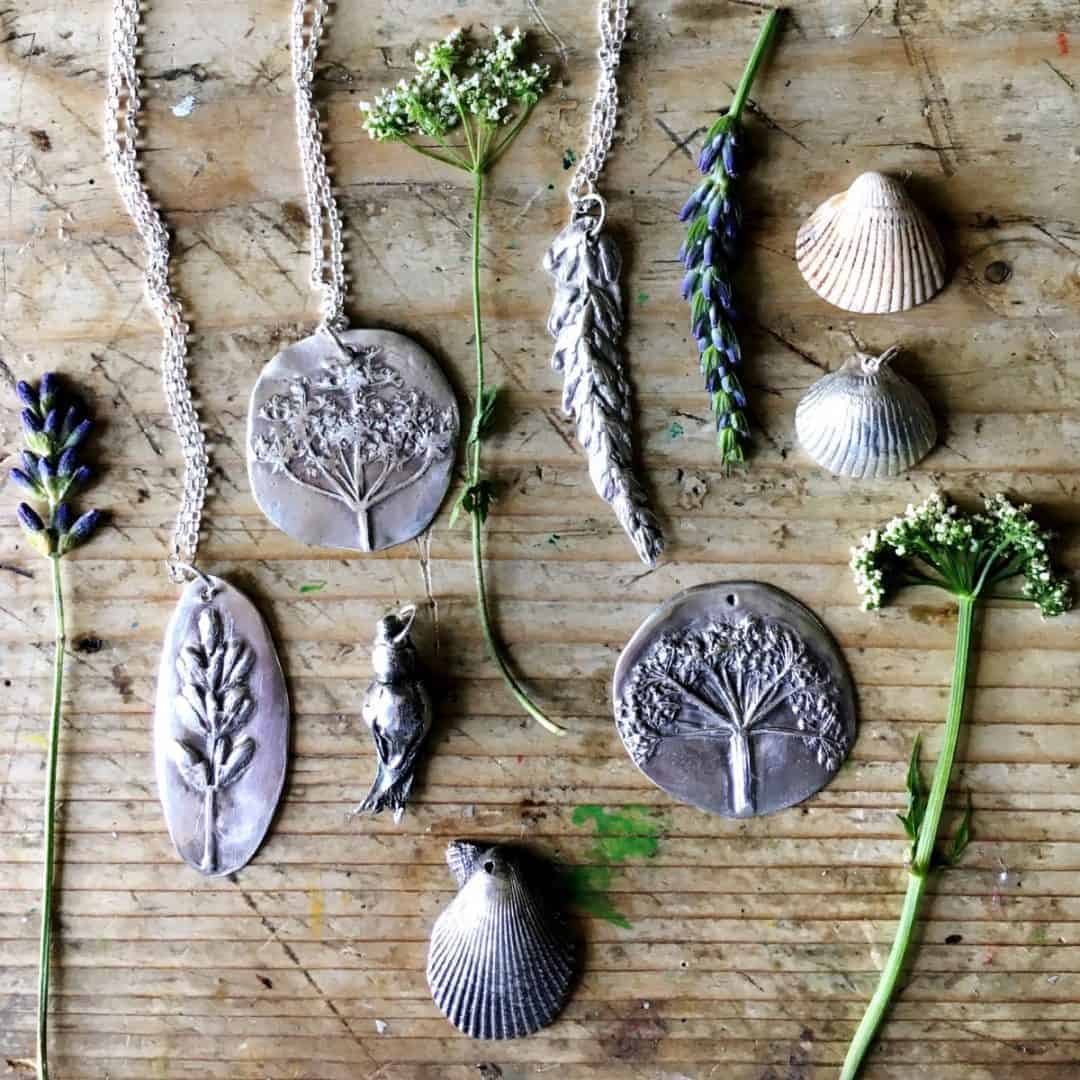
photo credit: Emma Mitchell
There is so much inspiration to be had over on Emma’s website and Instagram – plus you can book up silver clay and other creative workshops with her too. She has made a recording of her botanical illustration and mental health workshop that you can buy here. Emma has taught creative workshops on BBC Countryfile, at the Victorian and Albert Museum, the Bronté Parsonage Museum and at various National Trust Properties.
She has also written some inspiring books: The Wild Remedy (a richly illustrated and evocative diary that records her nature finds over the course of a year and shows how being in the wild benefits our mental and physical wellbeing); Made Well and <em&amp;amp;amp;amp;lt;/strong>&gt;Making Winter


photo credits: Emma Mitchell
I love Emma’s natural, artistic style and that she describes her work as ‘silver fossils’. It’s such a great phrase – and really captures a little of the magic of silver clay making, don’t you think?
You can also buy Emma’s finished silver clay creations on Etsy. She sells out fast, however, so I’d recommend keeping a close eye on her social media (Twitter or Insta) and maybe contacting her to request early access…
INFORMATION
The Economics of Silver Clay: How to Maximise Every Precious Gram
At £21 for just 16g, silver clay demands strategic planning. Here’s how experienced makers stretch their material without compromising results:
The Zero-Waste Workflow:
Save every scrap: Dried clay pieces, filing dust, and trimmed edges can be reconstituted with distilled water in a sealed container
Plan your layout: Sketch actual-size designs on graph paper before opening your clay packet
Thickness matters: Most pieces only need 5 playing cards thickness (approximately 1mm) – thicker doesn’t mean stronger after firing
Strategic sizing: Smaller charms (under 2cm) use 3-4g each; medium pendants (3-4cm) require 8-10g; large statement pieces need 12-15g
The Hidden Cost Saver:
Many beginners don’t realise that silver clay paste (applied with a syringe or brush) costs less per gram than lump clay. For detailed work like adding texture, building up areas, or attaching elements, paste delivers the same 99.9% silver result at nearly half the price. Mix your dried scraps with water to create your own paste and eliminate waste entirely.
Investment Return Calculator:
If you create earrings, you’ll typically use 6-8g of clay (approximately £8-11 in materials). Comparable fine silver earrings retail for £40-60, giving you a potential £30-50 value creation from a single morning’s work.
The Sensory Transformation Journey: What Actually Happens During Firing
The magical moment when clay becomes silver involves specific chemical and physical changes that most tutorials gloss over. Understanding this transformation helps you achieve better results and troubleshoot problems.
The Three Stages of Metamorphosis:
Stage 1 – Dehydration (0-200°C):
Remaining moisture evaporates; piece may appear unchanged but becomes fragile
Stage 2 – Binder Burn-off (200-500°C):
Organic binder combusts completely; faint smoke may be visible; piece turns white-grey
Stage 3 – Sintering (500-800°C):
Silver particles fuse together; piece glows salmon-pink; molecular structure permanently changes
The “Salmon Moment” Decoded:
That specific salmon colour (not orange, not red) indicates the silver has reached 760-800°C – the precise temperature where silver particles bond without melting. Hold this temperature for exactly two minutes to ensure complete fusion throughout the piece. Too short and your silver remains fragile; too long and fine details may blur.
The Brush Revelation:
When you brush away the white coating post-firing, you’re actually removing silver oxide from the surface. This same oxide layer is what gives silver its tarnish-resistant properties initially – your piece won’t tarnish for several weeks because of this protective microscopic layer. Once buffed to high shine, regular silver polishing rules apply.
FAQs
Can I use silver clay if I don’t have a kiln?
Yes, absolutely. PMC3 and Art Clay Silver can both be fired using a standard handheld blowtorch (the type used for crème brûlée works perfectly). You’ll need a heatproof surface, a timer, and good ventilation, but the process is straightforward and safe for home use. Many jewellers prefer torch firing for small pieces as it gives more control over the process.
How do I store unused silver clay to prevent it drying out?
Wrap your clay tightly in cling film, place it in a small airtight container or zip-lock bag with a slightly damp piece of kitchen paper (not touching the clay directly), and store in a cool place. Properly stored clay lasts 6-12 months. If it does dry out, you can often reconstitute it by adding distilled water drop by drop and kneading until it reaches the right consistency again.
Can I incorporate gemstones or glass into silver clay pieces?
Yes, but only certain stones can withstand the firing temperatures. Lab-created stones like cubic zirconia, and natural stones including diamonds, garnets, and peridot are kiln-safe. However, popular stones like opals, pearls, emeralds, and turquoise will be damaged by heat. These must be set after firing using traditional setting techniques or by creating a bezel setting in your clay design before firing.
What’s the difference between silver clay and traditional silversmithing in terms of final quality?
Silver clay produces 99.9% fine silver (higher purity than sterling silver’s 92.5%), which is softer and more tarnish-resistant. However, it’s also slightly more delicate than sterling, making it less suitable for items that receive heavy wear like rings worn daily. The detail achievable with silver clay often surpasses traditional methods, especially for botanical impressions and intricate textures that would be nearly impossible to create through conventional metalworking.
How can I make my own silicone moulds from natural objects?
Mix a two-part food-safe silicone compound (like Pebeo Silicone Fast Set) according to instructions, press your botanical specimen or object firmly into the silicone, and leave to cure for the recommended time (usually 20-30 minutes). Once set, remove your original object and you’ll have a flexible, reusable mould. Choose specimens that are relatively flat or have one detailed side, as three-dimensional objects require more complex mould-making techniques involving multiple parts.
Further Reading
For more ideas and inspiration about working with precious metal clay, why not take a look at these books…
Working with Precious Metal Clay (Jewellery Handbooks)
Art of Metal Clay, Revised and Expanded, The: Techniques for Creating Jewelry and Decorative Objects
Are you a maker or creative course provider? Like to list with us and benefit from joining our supportive community? We’d love to hear from you. Check out the packages we offer on our Join Us page.
This article contains affiliate links, which means we may earn a small commission if a reader clicks through and makes a purchase. All our blog posts are independent and in no way influenced by any advertiser or commercial initiative. By clicking on an affiliate link, you accept that third-party cookies will be set.


Gracias por enseñar la técnica, muy interesante